
 Android自定义View
# 基础
# 自定义View分类
| 类型 | 定义 |
|---|---|
| 自定义组合控件 | 将多个组件组合在一起 |
| 继承系统组件 | 继承Android自带UI控件,进行功能拓展 |
| 继承View | 直接继承View,实现控件高度定制 |
| 继承viewGroup | 直接接触ViewGroup类控件,比如LinearLayout等等 |
# 坐标系
在Android坐标系中,以屏幕左上角作为原点,向右为x轴正方向,向下为y轴正方向,如图:
# 继承View & 继承viewGroup
# 构造函数
无论是我们继承系统View还是直接继承View,都需要对构造函数进行重写,构造函数有多个,至少要重写其中一个才行。
| 构造函数 | 说明 |
|---|---|
| DemoView(Context context) | 在java代码里new的时候会用到 |
| DemoView(Context context, AttributeSet attrs) | 在xml布局文件中使用时自动调用 |
| DemoView(Context context, AttributeSet attrs, int defStyleAttr) | 不会自动调用,如果有默认style时,在第二个构造函数中调用 |
| DemoView(Context context, AttributeSet attrs, int defStyleAttr, int defStyleRes) | 只有在API版本>21时才会用到,不会自动调用,如果有默认style时,在第二个构造函数中调用 |
public class DemoView extends View {
     /**
     * 在java代码里new的时候会用到
     * @param context
     */
    public DemoView(Context context) {
        super(context);
    }

    /**
     * 在xml布局文件中使用时自动调用
     * @param context
     */
    public DemoView(Context context, @Nullable AttributeSet attrs) {
        super(context, attrs);
    }

    /**
     * 不会自动调用,如果有默认style时,在第二个构造函数中调用
     * @param context
     * @param attrs
     * @param defStyleAttr
     */
    public DemoView(Context context, @Nullable AttributeSet attrs, int defStyleAttr) {
        super(context, attrs, defStyleAttr);
    }

    /**
     * 只有在API版本>21时才会用到
     * 不会自动调用,如果有默认style时,在第二个构造函数中调用
     * @param context
     * @param attrs
     * @param defStyleAttr
     * @param defStyleRes
     */
    public DemoView(Context context, @Nullable AttributeSet attrs, int defStyleAttr, int defStyleRes) {
        super(context, attrs, defStyleAttr, defStyleRes);
    }
}
2
3
4
5
6
7
8
9
10
11
12
13
14
15
16
17
18
19
20
21
22
23
24
25
26
27
28
29
30
31
32
33
34
35
36
37
38
39
40
41
# 自定义View
Android系统的控件以android开头的都是系统自带的属性。为了方便配置自定义View的属性,我们也可以自定义属性值。
Android自定义属性可分为以下几步:
- 自定义一个View
- 编写values/attrs.xml,在其中编写styleable和item等标签元素
- 在布局文件中View使用自定义的属性(注意namespace)
- 在View的构造方法中通过TypedArray获取
# 定义属性
    <?xml version="1.0" encoding="utf-8"?>
    <resources>
        <declare-styleable name="demo">
            <!--颜色-->
            <attr name = "textColor" format = "#000000" />
            <!--布尔值-->
            <attr name = "focusable" format = "boolean" />
            <!--尺寸值-->
            <attr name = "layout_width" format = "dimension" />
            <!--浮点值-->
            <attr name = "fromAlpha" format = "float" />
            <!--整型值-->
            <attr name="testAttr" format="integer" />
            <!--字符串-->
            <attr name="text" format="string" />
            <!--百分数-->
            <attr name = "pivotX" format = "fraction" />
            <!--枚举值-->
            <attr name="orientation">
                <enum name="horizontal" value="0" />
                <enum name="vertical" value="1" />
            </attr>
            <!--位或运算-->
            <attr name="gravity">
                <flag name="top" value="0x01" />
                <flag name="bottom" value="0x02" />
                <flag name="left" value="0x04" />
                <flag name="right" value="0x08" />
                <flag name="center_vertical" value="0x16" />
            </attr>
            <!--混合类型-->
            <attr name = "background" format = "reference|color" />
        </declare-styleable>
    </resources>
2
3
4
5
6
7
8
9
10
11
12
13
14
15
16
17
18
19
20
21
22
23
24
25
26
27
28
29
30
31
32
33
34
35
# 获取XML定义属性
- TintTypedArray
- TypedArray
2
# 绘画流程
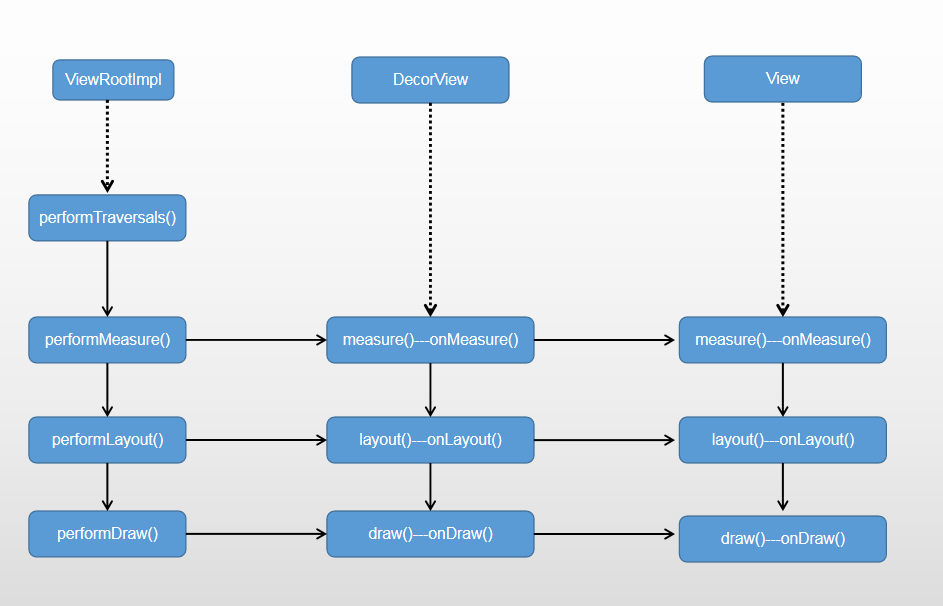
ViewRootImpl
位于Android源码 frameworks/base/core/java/android/view/ViewRootImpl.java
ViewRootImpl是连接WindowManager和DecorView的桥梁,View的绘制流程开始于ViewRootImpl得performTraversals方法,只有经过measure、layout、draw三个流程才能最终绘制出View;
如上图: performTraversals()依次调用performMeasure()、performLayout()和performDraw()三个方法,分别完成顶级View的绘制;
其中performMeasure()会调用measure(),measure()中又调用onMeasure(),实现对其所有子元素的measure过程,这样就完成了一次measure过程;接着子元素会重复父容器的measure过程,如此反复至完成整个View树的遍历(layout和draw同理).
View绘制流程如上图,其中最重要的三个方法:
- onMeasure
- onLayout
- onDraw
# onMeasure
- MeasureSpec
MeasureSpec主要方法:
| 方法/变量 | 说明 | 对应 |
|---|---|---|
| getMode(int mode) | 获取测量模式 | |
| getSize(int size) | 获取测量大小 | |
| makeMeasureSpec(int size,int mode) | 通过Mode和Size生成新的SpecMode | |
| AT_MOST | 最大模式,View的尺寸有一个最大值,View不可以超过MeasureSpec当中的Size值 | match_parent |
| EXACTLY | 精准模式,View需要一个精确值,这个值即为MeasureSpec当中的Size | wrap_content |
| UNSPECIFIED | 无限制,View对尺寸没有任何限制,View设置为多大就应当为多大 | 一般系统内部使用 |
setMeasuredDimension(int measuredWidth, int measuredHeight)
该方法用来设置View的宽高,在我们自定义View时也会经常用到。getDefaultSize(int size, int measureSpec)
该方法用来获取View默认的宽高
    /**
     * Utility to return a default size. Uses the supplied size if the
     * MeasureSpec imposed no constraints. Will get larger if allowed
     * by the MeasureSpec.
     *
     * @param size Default size for this view
     * @param measureSpec Constraints imposed by the parent
     * @return The size this view should be.
     */
    public static int getDefaultSize(int size, int measureSpec) {
        int result = size;
        int specMode = MeasureSpec.getMode(measureSpec);
        int specSize = MeasureSpec.getSize(measureSpec);

        switch (specMode) {
        case MeasureSpec.UNSPECIFIED:
            result = size;
            break;
        case MeasureSpec.AT_MOST:
        case MeasureSpec.EXACTLY:
            result = specSize;
            break;
        }
        return result;
    }
2
3
4
5
6
7
8
9
10
11
12
13
14
15
16
17
18
19
20
21
22
23
24
25
26
27
28
# onLayout
主要用于自定义ViewGroup
常用方法有
| 方法/变量 | 说明 | 对应 |
|---|---|---|
| getChildCount() | ||
| getChildAt() | ||
| measureChild() |
# onDraw
- Step 1, draw the background, if needed
- skip step 2 & 5 if possible (common case)
- Step 3, draw the content
- Step 4, draw the children
- Step 7, draw the default focus highlight
- Step 2, save the canvas' layers
- Step 3, draw the content
- Step 4, draw the children
- Step 5, draw the fade effect and restore layers
- Step 6, draw decorations (foreground, scrollbars)
 public void draw(Canvas canvas) {
        final int privateFlags = mPrivateFlags;
        final boolean dirtyOpaque = (privateFlags & PFLAG_DIRTY_MASK) == PFLAG_DIRTY_OPAQUE &&
                (mAttachInfo == null || !mAttachInfo.mIgnoreDirtyState);
        mPrivateFlags = (privateFlags & ~PFLAG_DIRTY_MASK) | PFLAG_DRAWN;

        /*
         * Draw traversal performs several drawing steps which must be executed
         * in the appropriate order:
         *
         *      1. Draw the background
         *      2. If necessary, save the canvas' layers to prepare for fading
         *      3. Draw view's content
         *      4. Draw children
         *      5. If necessary, draw the fading edges and restore layers
         *      6. Draw decorations (scrollbars for instance)
         */

        // Step 1, draw the background, if needed
        int saveCount;

        if (!dirtyOpaque) {
            drawBackground(canvas);
        }

        // skip step 2 & 5 if possible (common case)
        final int viewFlags = mViewFlags;
        boolean horizontalEdges = (viewFlags & FADING_EDGE_HORIZONTAL) != 0;
        boolean verticalEdges = (viewFlags & FADING_EDGE_VERTICAL) != 0;
        if (!verticalEdges && !horizontalEdges) {
            // Step 3, draw the content
            if (!dirtyOpaque) onDraw(canvas);

            // Step 4, draw the children
            dispatchDraw(canvas);

            drawAutofilledHighlight(canvas);

            // Overlay is part of the content and draws beneath Foreground
            if (mOverlay != null && !mOverlay.isEmpty()) {
                mOverlay.getOverlayView().dispatchDraw(canvas);
            }

            // Step 6, draw decorations (foreground, scrollbars)
            onDrawForeground(canvas);

            // Step 7, draw the default focus highlight
            drawDefaultFocusHighlight(canvas);

            if (debugDraw()) {
                debugDrawFocus(canvas);
            }

            // we're done...
            return;
        }

        /*
         * Here we do the full fledged routine...
         * (this is an uncommon case where speed matters less,
         * this is why we repeat some of the tests that have been
         * done above)
         */

        boolean drawTop = false;
        boolean drawBottom = false;
        boolean drawLeft = false;
        boolean drawRight = false;

        float topFadeStrength = 0.0f;
        float bottomFadeStrength = 0.0f;
        float leftFadeStrength = 0.0f;
        float rightFadeStrength = 0.0f;

        // Step 2, save the canvas' layers
        int paddingLeft = mPaddingLeft;

        final boolean offsetRequired = isPaddingOffsetRequired();
        if (offsetRequired) {
            paddingLeft += getLeftPaddingOffset();
        }

        int left = mScrollX + paddingLeft;
        int right = left + mRight - mLeft - mPaddingRight - paddingLeft;
        int top = mScrollY + getFadeTop(offsetRequired);
        int bottom = top + getFadeHeight(offsetRequired);

        if (offsetRequired) {
            right += getRightPaddingOffset();
            bottom += getBottomPaddingOffset();
        }

        final ScrollabilityCache scrollabilityCache = mScrollCache;
        final float fadeHeight = scrollabilityCache.fadingEdgeLength;
        int length = (int) fadeHeight;

        // clip the fade length if top and bottom fades overlap
        // overlapping fades produce odd-looking artifacts
        if (verticalEdges && (top + length > bottom - length)) {
            length = (bottom - top) / 2;
        }

        // also clip horizontal fades if necessary
        if (horizontalEdges && (left + length > right - length)) {
            length = (right - left) / 2;
        }

        if (verticalEdges) {
            topFadeStrength = Math.max(0.0f, Math.min(1.0f, getTopFadingEdgeStrength()));
            drawTop = topFadeStrength * fadeHeight > 1.0f;
            bottomFadeStrength = Math.max(0.0f, Math.min(1.0f, getBottomFadingEdgeStrength()));
            drawBottom = bottomFadeStrength * fadeHeight > 1.0f;
        }

        if (horizontalEdges) {
            leftFadeStrength = Math.max(0.0f, Math.min(1.0f, getLeftFadingEdgeStrength()));
            drawLeft = leftFadeStrength * fadeHeight > 1.0f;
            rightFadeStrength = Math.max(0.0f, Math.min(1.0f, getRightFadingEdgeStrength()));
            drawRight = rightFadeStrength * fadeHeight > 1.0f;
        }

        saveCount = canvas.getSaveCount();

        int solidColor = getSolidColor();
        if (solidColor == 0) {
            if (drawTop) {
                canvas.saveUnclippedLayer(left, top, right, top + length);
            }

            if (drawBottom) {
                canvas.saveUnclippedLayer(left, bottom - length, right, bottom);
            }

            if (drawLeft) {
                canvas.saveUnclippedLayer(left, top, left + length, bottom);
            }

            if (drawRight) {
                canvas.saveUnclippedLayer(right - length, top, right, bottom);
            }
        } else {
            scrollabilityCache.setFadeColor(solidColor);
        }

        // Step 3, draw the content
        if (!dirtyOpaque) onDraw(canvas);

        // Step 4, draw the children
        dispatchDraw(canvas);

        // Step 5, draw the fade effect and restore layers
        final Paint p = scrollabilityCache.paint;
        final Matrix matrix = scrollabilityCache.matrix;
        final Shader fade = scrollabilityCache.shader;

        if (drawTop) {
            matrix.setScale(1, fadeHeight * topFadeStrength);
            matrix.postTranslate(left, top);
            fade.setLocalMatrix(matrix);
            p.setShader(fade);
            canvas.drawRect(left, top, right, top + length, p);
        }

        if (drawBottom) {
            matrix.setScale(1, fadeHeight * bottomFadeStrength);
            matrix.postRotate(180);
            matrix.postTranslate(left, bottom);
            fade.setLocalMatrix(matrix);
            p.setShader(fade);
            canvas.drawRect(left, bottom - length, right, bottom, p);
        }

        if (drawLeft) {
            matrix.setScale(1, fadeHeight * leftFadeStrength);
            matrix.postRotate(-90);
            matrix.postTranslate(left, top);
            fade.setLocalMatrix(matrix);
            p.setShader(fade);
            canvas.drawRect(left, top, left + length, bottom, p);
        }

        if (drawRight) {
            matrix.setScale(1, fadeHeight * rightFadeStrength);
            matrix.postRotate(90);
            matrix.postTranslate(right, top);
            fade.setLocalMatrix(matrix);
            p.setShader(fade);
            canvas.drawRect(right - length, top, right, bottom, p);
        }

        canvas.restoreToCount(saveCount);

        drawAutofilledHighlight(canvas);

        // Overlay is part of the content and draws beneath Foreground
        if (mOverlay != null && !mOverlay.isEmpty()) {
            mOverlay.getOverlayView().dispatchDraw(canvas);
        }

        // Step 6, draw decorations (foreground, scrollbars)
        onDrawForeground(canvas);

        if (debugDraw()) {
            debugDrawFocus(canvas);
        }
    }
2
3
4
5
6
7
8
9
10
11
12
13
14
15
16
17
18
19
20
21
22
23
24
25
26
27
28
29
30
31
32
33
34
35
36
37
38
39
40
41
42
43
44
45
46
47
48
49
50
51
52
53
54
55
56
57
58
59
60
61
62
63
64
65
66
67
68
69
70
71
72
73
74
75
76
77
78
79
80
81
82
83
84
85
86
87
88
89
90
91
92
93
94
95
96
97
98
99
100
101
102
103
104
105
106
107
108
109
110
111
112
113
114
115
116
117
118
119
120
121
122
123
124
125
126
127
128
129
130
131
132
133
134
135
136
137
138
139
140
141
142
143
144
145
146
147
148
149
150
151
152
153
154
155
156
157
158
159
160
161
162
163
164
165
166
167
168
169
170
171
172
173
174
175
176
177
178
179
180
181
182
183
184
185
186
187
188
189
190
191
192
193
194
195
196
197
198
199
200
201
202
203
204
205
206
207
208
- onDraw里重要方法
| 方法 | 说明 |
|---|---|
| postInvalidate() | 1.重绘UI 2.调用postInvalidate()后系统会重新调用onDraw方法画一次 |
| postInvalidate(int left, int top, int right, int bottom) | |
| postInvalidateDelayed(long delayMilliseconds) | |
| postInvalidateDelayed(long delayMilliseconds, int left, int top,int right, int bottom) | |
| invalidate() | 1.在UI线程自身中使用 2.不能直接在线程中调用 |
# 自定义组合控件
自定义组合控件就是将多个控件组合成为一个新的控件,主要解决多次重复使用同一类型的布局,如dailog等,我们都可以把他们组合成一个新的控件。基本流程如下:
- 1.编写布局文件
- 2.实现构造方法
- 初始化UI
- 提供对外的方法
- 在布局当中引用该控件
# 编写布局文件
编写布局文件dialog_friend.xml,源码如下图:
<?xml version="1.0" encoding="utf-8"?>
<RelativeLayout xmlns:android="http://schemas.android.com/apk/res/android"
    xmlns:tools="http://schemas.android.com/tools"
    android:layout_width="match_parent"
    android:layout_height="match_parent"
    android:background="@drawable/dialog_bg">

    <RelativeLayout
        android:layout_width="match_parent"
        android:layout_height="match_parent"
        android:background="@drawable/dialog_bg"
        android:orientation="vertical">

        <TextView
            android:id="@+id/tip"
            android:layout_width="match_parent"
            android:layout_height="wrap_content"
            android:background="@drawable/dialog_bg_top"
            android:gravity="center"
            android:padding="20dp"
            android:text="温馨提示"
            android:textColor="#FFD306"
            android:textSize="20dp" />


        <ScrollView
            android:layout_width="match_parent"
            android:layout_height="wrap_content"
            android:layout_above="@id/view"
            android:layout_below="@+id/tip"
            android:background="@color/colorWhite">

            <TextView
                android:layout_width="match_parent"
                android:layout_height="wrap_content"
                android:layout_marginLeft="20dp"
                android:layout_marginRight="20dp"
                android:text="提示信息"
                android:textSize="20dp" />

        </ScrollView>


        <View
            android:id="@+id/view"
            android:layout_width="match_parent"
            android:layout_height="1dp"
            android:layout_above="@+id/ll_btn"
            android:layout_marginTop="0dp"
            android:background="#c0c0c0" />

        <LinearLayout
            android:id="@+id/ll_btn"
            android:layout_width="match_parent"
            android:layout_height="wrap_content"
            android:layout_alignParentBottom="true"
            android:background="@drawable/dialog_bg_bottom"
            android:orientation="horizontal">

            <TextView
                android:id="@+id/btn_know"
                android:layout_width="0dp"
                android:layout_height="wrap_content"
                android:layout_weight="1"
                android:gravity="center"
                android:paddingBottom="15dp"
                android:paddingTop="15dp"
                android:text="知道了"
                android:textColor="#FFD306"
                android:textSize="17dp" />

        </LinearLayout>


    </RelativeLayout>

</RelativeLayout>
2
3
4
5
6
7
8
9
10
11
12
13
14
15
16
17
18
19
20
21
22
23
24
25
26
27
28
29
30
31
32
33
34
35
36
37
38
39
40
41
42
43
44
45
46
47
48
49
50
51
52
53
54
55
56
57
58
59
60
61
62
63
64
65
66
67
68
69
70
71
72
73
74
75
76
77
78
79
80
# 实现构造方法
public class FriendDialog extends Dialog {


    private Timer timer;

    private int second = 8;

    private TextView tv_know;
    private LinearLayout linearLayout;

    ......

    public FriendDialog(@NonNull Context context, int width, int height, @IdRes int layout, int style) {
        super(context);
        initView(context);
        initTimer();

    }


    ......
    private void initView(Context context) {
        ...
    }

    private void initTimer() {
        ...
    }

}
2
3
4
5
6
7
8
9
10
11
12
13
14
15
16
17
18
19
20
21
22
23
24
25
26
27
28
29
30
31
32
33
# 初始化UI
    private void initView(Context context) {

         View view = getLayoutInflater().inflate(R.layout.dialog_friend, null);

        setContentView(view);
        Window window = getWindow();
        WindowManager.LayoutParams params = window.getAttributes();
        params.gravity = Gravity.CENTER;
        params.height = context.getResources().getDisplayMetrics().heightPixels - 60;
        params.width = context.getResources().getDisplayMetrics().widthPixels - 60;


        //去背景
        this.getWindow().setBackgroundDrawableResource(android.R.color.transparent);
        window.setAttributes(params);

        setCancelable(false);

        linearLayout = view.findViewById(R.id.ll_btn);

        linearLayout.setOnClickListener(new View.OnClickListener() {
            @Override
            public void onClick(View v) {
                mHandler.sendEmptyMessage(destorytimer);
                dismiss();
            }
        });

        tv_know = view.findViewById(R.id.btn_know);
        tv_know.setText("知道了( " + second + "s )");

    }
2
3
4
5
6
7
8
9
10
11
12
13
14
15
16
17
18
19
20
21
22
23
24
25
26
27
28
29
30
31
32
33
34
# 提供对外的方法
针对内部相关控件提供相关接口,比如文字大小颜色,按钮的使能与否等各种功能
# 在布局当中引用该控件
和正常控件调用一样,也采用findViewById来获取,对外暴露相关需要的接口
# 继承系统控件
- 继承系统的控件可以分为继承View子类(如TextVIew、Button等)
- 继承ViewGroup子类(如LinearLayout等)
# 进阶
# Paint专题
| 常量 | 说明 |
|---|---|
| ANTI_ALIAS_FLAG | |
| CURSOR_AFTER | |
| CURSOR_AT | |
| CURSOR_AT_OR_AFTER | |
| CURSOR_AT_OR_BEFORE | |
| CURSOR_BEFORE | |
| DEV_KERN_TEXT_FLAG | |
| DITHER_FLAG | |
| EMBEDDED_BITMAP_TEXT_FLAG | |
| END_HYPHEN_EDIT_INSERT_ARMENIAN_HYPHEN | |
| END_HYPHEN_EDIT_INSERT_HYPHEN | |
| END_HYPHEN_EDIT_INSERT_MAQAF | |
| 方法 | 说明 |
|---|---|
| Paint(Paint paint) | |
| Paint(int flags) | |
| Paint() | |
| reset() | 重置Paint |
| setStyle(Style style) | 设置绘制模式 |
| setColor(int color) | 设置颜色 |
| setStrokeWidth(float width) | 设置线条宽度,画笔样式为空心时,设置空心画笔的宽度 |
| setTextSize(float textSize) | 设置文字大小 |
| .setAntiAlias(boolean aa) | 设置抗锯齿开关 |
| setAlpha(int a) | 设置画笔的透明度[0-255],0是完全透明,255是完全不透明 |
| setColorFilter(ColorFilter filter) | 设置图形重叠时的显示方式,下面来演示一下 |
| setARGB(int a, int r, int g, int b) | 设置画笔颜色,argb形式alpha,red,green,blue每个范围都是[0-255] |
| setTextScaleX(float scaleX) | 设置字体的水平方向的缩放因子,默认值为1,大于1时会沿X轴水平放大,小于1时会沿X轴水平缩小 |
| ,setTypeface(Typeface typeface) | 设置字体样式 |
| setFakeBoldText(boolean fakeBoldText) | 设置文本粗体 |
| setStrikeThruText(boolean strikeThruText) | 设置文本的删除线 |
| setUnderlineText(boolean underlineText) | 设置文本的下划线 |
| setFlags(int flags) | 设置一些标志,比如抗锯齿,下划线等等 |
| setLetterSpacing(float letterSpacing) | 设置行的间距,默认值是0,负值行间距会收缩 |
| setStrokeMiter(float miter) | 当style为Stroke或StrokeAndFill时设置连接处的倾斜度,这个值必须大于0,看一下演示结果 |
| setDither(boolean dither) | 设置是否抖动,如果不设置感觉就会有一些僵硬的线条,如果设置图像就会看的更柔和一些 |
| setStrokeCap(Paint.Cap cap) | 设置线冒样式,取值有Cap.ROUND(圆形线冒)、Cap.SQUARE(方形线冒)、Paint.Cap.BUTT(无线冒) |
| setStrokeJoin(Paint.Join join) | 设置线段连接处样式,取值有:Join.MITER(结合处为锐角)、Join.Round(结合处为圆弧)、Join.BEVEL(结合处为直线) |
# Cavcas专题
| 方法 | 说明 |
|---|---|
| drawRect(RectF rect, Paint paint) | 绘制区域,参数一为RectF一个区域 |
| drawPath(Path path, Paint paint) | 绘制一个路径,参数一为Path路径对象 |
| drawBitmap(Bitmap bitmap, Rect src, Rect dst, Paint paint) | 贴图,参数一就是我们常规的Bitmap对象,参数二是源区域(这里是bitmap),参数三是目标区域(应该在canvas的位置和大小),参数四是Paint画刷对象,因为用到了缩放和拉伸的可能,当原始Rect不等于目标Rect时性能将会有大幅损失。 |
| drawLine(float startX, float startY, float stopX, float stopY, Paintpaint) | 画线,参数一起始点的x轴位置,参数二起始点的y轴位置,参数三终点的x轴水平位置,参数四y轴垂直位置,最后一个参数为Paint 画刷对象 |
| drawPoint(float x, float y, Paint paint) | 画点,参数一水平x轴,参数二垂直y轴,第三个参数为Paint对象 |
| drawText(String text, float x, floaty, Paint paint) | 渲染文本,Canvas类除了上面的还可以描绘文字,参数一是String类型的文本,参数二x轴,参数三y轴,参数四是Paint对象 |
| drawOval(RectF oval, Paint paint) | 画椭圆,参数一是扫描区域,参数二为paint对象 |
| drawCircle(float cx, float cy, float radius,Paint paint) | 绘制圆,参数一是中心点的x轴,参数二是中心点的y轴,参数三是半径,参数四是paint对象 |
| drawArc(RectF oval, float startAngle, float sweepAngle, boolean useCenter, Paint paint) | 画弧,参数一是RectF对象,一个矩形区域椭圆形的界限用于定义在形状、大小、电弧,参数二是起始角(度)在电弧的开始,参数三扫描角(度)开始顺时针测量的,参数四是如果这是真的话,包括椭圆中心的电弧,并关闭它,如果它是假这将是一个弧线,参数五是Paint对象 |
# Path专题
1.
2.
| 变量 | 说明 |
|---|---|
| Path.Direction.CW | 顺时针 |
| Path.Direction.CCW | 逆时针 |
| Path.FillType.WINDING | |
| Path.FillType.EVEN_ODD | |
| Path.FillType.INVERSE_WINDING | |
| Path.FillType.INVERSE_EVEN_ODD | |
| Path.Op.DIFFERENCE | |
| Path.Op.INTERSECT | |
| Path.Op.UNION | |
| Path.Op.XOR | |
| Path.Op.REVERSE_DIFFERENCE |
| 方法 | 说明 |
|---|---|
| lineTo(float x, float y) | 1.从上一个点到参数坐标点之间连一条线 2.如果没有进行过操作则默认点为坐标原点 |
| moveTo(float x, float y) | 1.移动下一次操作的起点位置 2.不影响上一次操作,影响下一次操作 |
| setLastPoint(float dx, float dy) | 1.设置之前操作的最后一个点位置 2.影响上一次操作,影响下一次操作 |
| close() | 1.连接当前最后一个点和最初的一个点(如果两个点不重合的话),最终形成一个封闭的图形 2.close的作用是封闭路径,与连接当前最后一个点和第一个点并不等价。如果连接了最后一个点和第一个点仍然无法形成封闭图形,则close什么 也不做 |
| addCircle(float x, float y, float radius, Direction dir) | 1. 2. |
| addRect(float left, float top, float right, float bottom, Direction dir) | |
| reset() | |
| rewind() | |
| set(Path src) | |
| op(Path path, Op op) | |
| op(Path path1, Path path2, Op op) | |
| isConvex() | |
| setFillType(FillType ft) | |
| getFillType() | |
| isInverseFillType() | |
| toggleInverseFillType() | |
| isEmpty() | |
| isRect(RectF rect) | |
| computeBounds(RectF bounds, boolean exact) | |
| incReserve(int extraPtCount) | |
| rMoveTo(float dx, float dy) | |
| rLineTo(float dx, float dy) | |
| quadTo(float x1, float y1, float x2, float y2) | |
| rQuadTo(float dx1, float dy1, float dx2, float dy2) | |
| cubicTo(float x1, float y1, float x2, float y2, float x3, float y3) | |
| rCubicTo(float x1, float y1, float x2, float y2, float x3, float y3) | |
| arcTo(RectF oval, float startAngle, float sweepAngle, boolean forceMoveTo) | |
| arcTo(RectF oval, float startAngle, float sweepAngle) | |
| arcTo(float left, float top, float right, float bottom, float startAngle,float sweepAngle, boolean forceMoveTo) | |
| detectSimplePath(float left, float top, float right, float bottom, Direction dir) | |
| addRect(RectF rect, Direction dir) | |
| addRect(float left, float top, float right, float bottom, Direction dir) | |
| addOval(RectF oval, Direction dir) | |
| addOval(float left, float top, float right, float bottom, Direction dir) | |
| addCircle(float x, float y, float radius, Direction dir) | |
| addArc(RectF oval, float startAngle, float sweepAngle) | |
| addArc(float left, float top, float right, float bottom, float startAngle, float sweepAngle) | |
| addRoundRect(RectF rect, float rx, float ry, Direction dir) | |
| addRoundRect(float left, float top, float right, float bottom, float rx, float ry, Direction dir) | |
| addPath(Path src, float dx, float dy) | |
| addPath(Path src) | |
| addPath(Path src, Matrix matrix) | |
| offset(float dx, float dy, Path dst) | |
| offset(float dx, float dy) | |
| transform(Matrix matrix, Path dst) | |
| transform(Matrix matrix) |
# Bitmap专题
# 面试
# 坐标系
# 1.屏幕坐标系
由于移动设备一般定义屏幕左上角为坐标原点,向右为x轴增大方向,向下为y轴增大方向,
所以在手机屏幕上的坐标系与数学中常见的坐标系是稍微有点差别的,详情如下:
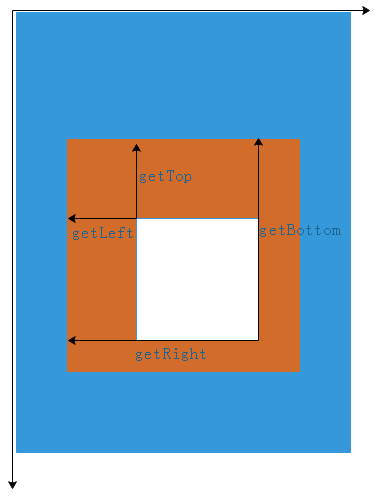
# 2.View坐标系
注意:View的坐标系统是相对于父控件而言的.
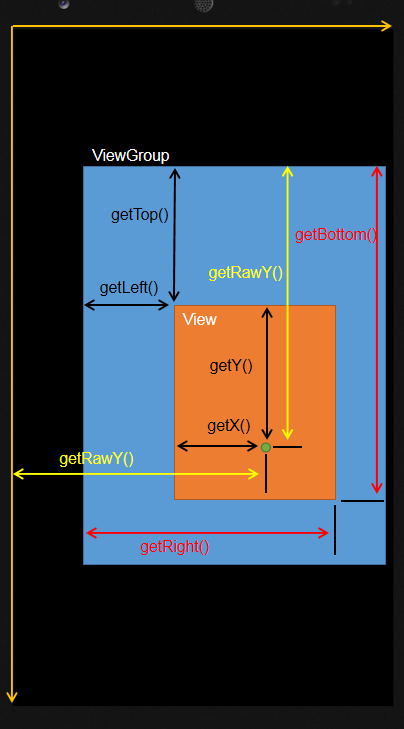
getTop();       //获取子View左上角距父View顶部的距离
getLeft();      //获取子View左上角距父View左侧的距离
getBottom();    //获取子View右下角距父View顶部的距离
getRight();     //获取子View右下角距父View左侧的距离
2
3
4
# 3.MotionEvent中 get 和 getRaw 的区别
event.getX();       //触摸点相对于其所在组件坐标系的坐标
event.getY();

event.getRawX();    //触摸点相对于屏幕默认坐标系的坐标
event.getRawY();
2
3
4
5
# 角度与弧度
# 一.前言
# 1.为什么讲这个?
在我们自定义View,尤其是制作一些复杂炫酷的效果的时候,实际上是将一些简单的东西通过数学上精密的计算组合到一起形成的效果。
这其中可能会涉及到画布的相关操作(旋转),以及一些正余弦函数的计算等,这些内容就会用到一些角度、弧度相关的知识。
# 2.为什么对角的描述存在角度与弧度两种单位?
简单来说就是为了方便,为了精确描述一个角的大小引入了角度与弧度的概念。
由于两者进制是不同的(角度是60进制,弧度是10进制),在合适的地方使用合适的单位来描述会更加方便。
例如: 角度是60进位制,遇到30°6′这样的角,应该转化为10进制的30.1°。但弧度就不需要,因为弧度本身就是十进制的实数。
# 二.角度与弧度的定义
角度和弧度一样都是描述角的一种度量单位,下面是它们的定义:
角度:两条射线从圆心向圆周射出,形成一个夹角和夹角正对的一段弧。当这段弧长正好等于圆周长的360分之一时,两条射线的夹角的大小为1度.
弧度:两条射线从圆心向圆周射出,形成一个夹角和夹角正对的一段弧。当这段弧长正好等于圆的半径时,两条射线的夹角大小为1弧度.
角度和弧度关系:360(角度) = 2π(弧度) 、 180(角度) = π(弧度)
# 颜色
# Android支持的颜色模式:
| 颜色模式 | 解释 |
|---|---|
| ARGB8888 | 四通道高精度(32位) |
| ARGB4444 | 四通道低精度(16位) |
| RGB565 | 屏幕默认模式(16位) |
| Alpha8 | 仅有透明通道(8位) |
其中 A R G B 的取值范围均为0255(即16进制的0x000xff)
A 从ox00到oxff表示从透明到不透明。
RGB 从0x00到0xff表示颜色从浅到深。
# 几种创建或使用颜色的方式
# Java中定义颜色
int color=Color.GRAY;  // 灰色
// Color类提供的颜色仅为有限的几个

int color = Color.argb(127, 255, 0, 0);   // 半透明红色

int color = 0xaaff0000;                   // 带有透明度的红色
2
3
4
5
6
7
# xml里定义颜色
在/res/values/color.xml 文件中如下定义:
<?xml version="1.0" encoding="utf-8"?>
<resources>
    <color name="red">#ff0000</color>
    <color name="green">#00ff00</color>
</resources>
2
3
4
5
# 在java里引用xml中定义的颜色
int color = getResources().getColor(R.color.red);
# 颜色混合模式(Alpha通道相关)
Alpha通道主要在两个图像混合的时候生效。
默认情况下,当一个颜色绘制到Canvas上时的混合模式是这样计算的:
(RGB通道) 最终颜色 = 绘制的颜色 + (1 - 绘制颜色的透明度) × Canvas上的原有颜色